

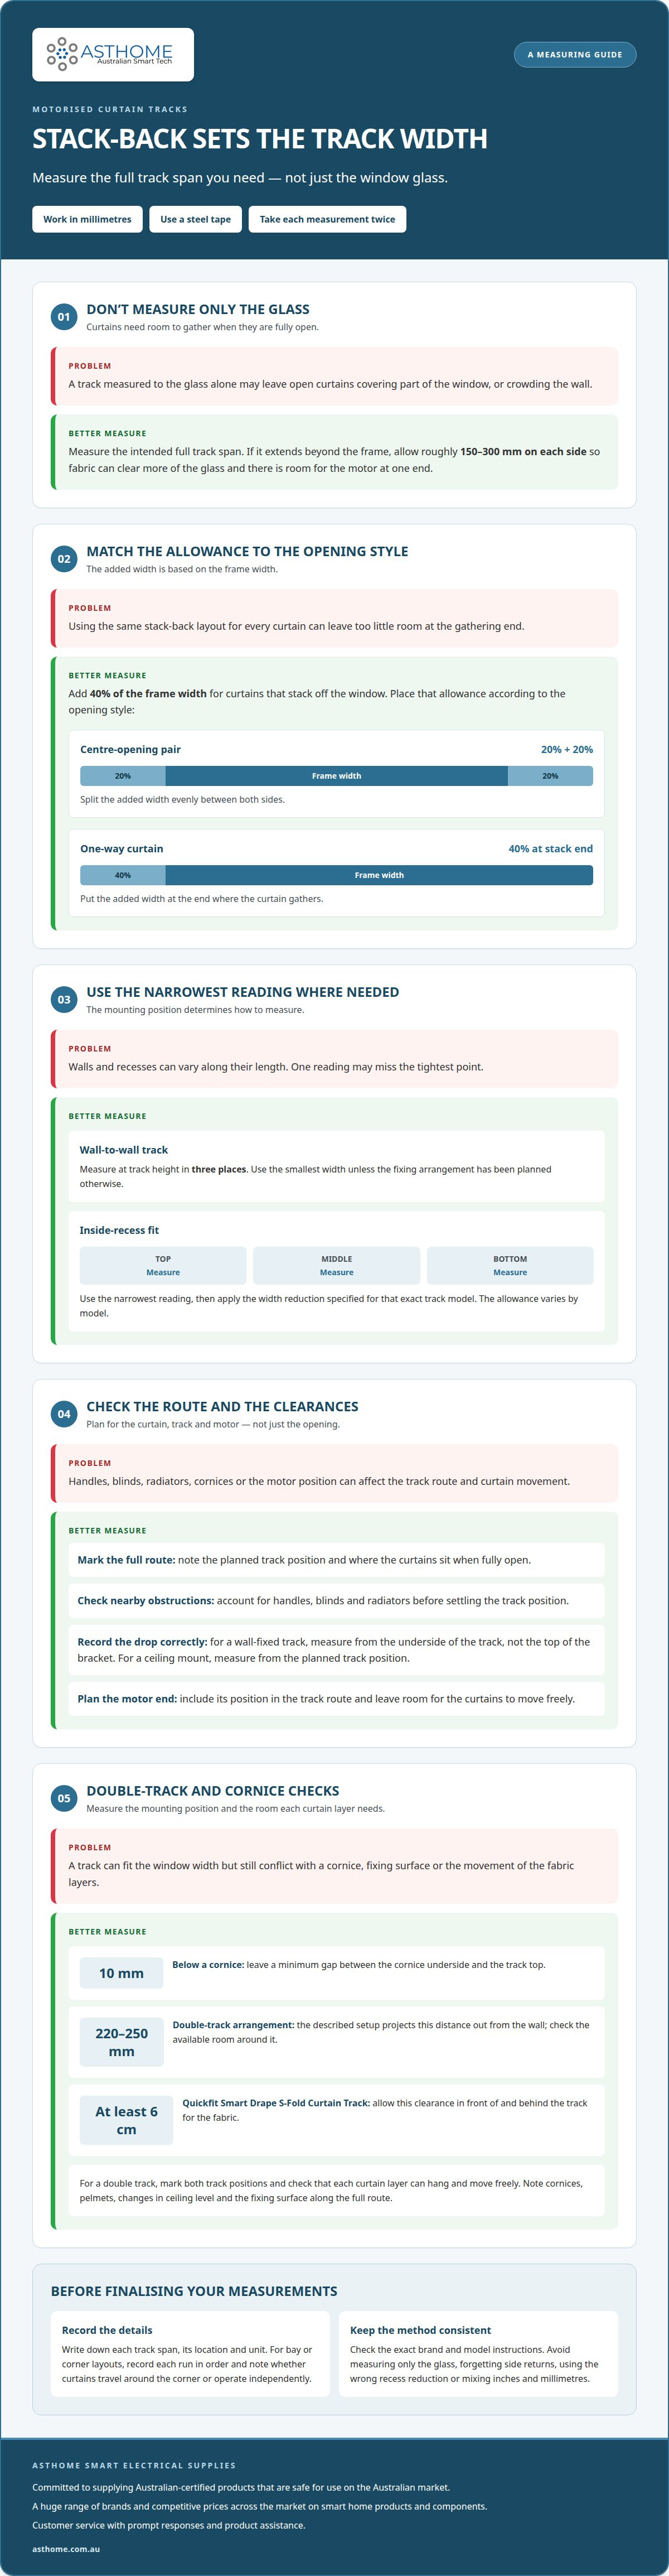
The motor doesn’t change how you measure a curtain track, but stack-back and mounting position affect the width you need. Measuring for a smart curtain track starts with the full intended track span, not just the window glass. For a track extending beyond the frame, allow roughly 150 to 300 mm on each side.
It’s easy to focus on the window width and overlook where the curtains will sit when fully open. That extra space helps the fabric clear more of the glass and leaves room for the motor at one end of the track.
This guide explains how to measure the track and drop, allow for stack-back, and check mounting, clearance and window-frame extensions. It also covers what to record for wall-to-wall, bay and corner layouts. Use a steel tape, work in millimetres and take each measurement twice, so you have clear figures when choosing a motorised track.
Key Takeaways
- For a wall-to-wall track, measure at the planned track height in three places and use the smallest width unless the fixing arrangement is planned otherwise.
- For a centre-opening curtain that stacks off the window, allow extra track width for the fabric to gather on both sides.
- Measure a wall-fixed curtain drop from the underside of the track, not the top of the bracket.
- Check how handles, blinds, radiators and the motor position may affect the track route and curtain movement.
- For bay or corner layouts, record each track run in order and note whether the curtains need to travel around the corner or operate independently.
How do I measure for a motorised curtain track?
Choose the track route first: above the window, inside the recess or wall-to-wall. The motor does not change the basic measuring method, but the opening style and track position affect the required width.
-
Choose the track width to measure
For a wall-mounted track framing a window, measure the window width, then allow 8-12 inches beyond each side for stack-back. For a track mounted outside a window recess, measure the intended track span across the wall, including the space beyond the frame. Don’t use the glass width alone if the track needs to extend past the window for the curtains to clear it.
-
Measure the recess and apply the reduction
For an inside-recess fit, measure the internal width at the planned track position. Take readings at the top, middle and bottom, then use the narrowest. Apply the width reduction specified by the track manufacturer for that model. The allowance varies, so do not use a deduction from another model or assume a wall-mounted measurement applies inside a recess.
-
Measure side returns and wall-to-wall width
For side returns, include the distance from each end of the track back towards the wall, so the curtains can cover the opening edges. For wall-to-wall installation, measure the width in three places at track height and use the smallest, unless the fixing arrangement has been planned otherwise. A listed example pairs a 102-inch window measurement with a 100-inch track measurement; for a ceiling-mounted track fitted wall-to-wall, subtract 1 inch from the wall width.
-
Check brand-specific measurement requirements
Compare the measurement method for the exact smart track brand and model. In Australia, requirements can differ, particularly for inside-recess deductions and whether the stated measurement means the track’s full length or the opening it covers. Record the finished width in millimetres, and follow that model’s instructions rather than mixing its ordering method with another brand’s.
- Decide whether the curtains split in the centre or draw to one side. For a centre-opening curtain that stacks off the window, add 40% to the frame width, split evenly as 20% on each side. For a one-way curtain stacking off the window, add 40% to the frame width.
- Check your notes before ordering. Common mistakes include measuring only the glass, forgetting side returns, applying the wrong recess deduction, or mixing inches and millimetres. Measure the planned track width twice with a steel tape, and label each figure with its location and unit.
Ceiling-mount and face-mount double curtain tracks
- Decide whether the track will fix to the ceiling, inside a recess or to the wall face. A ceiling mount follows a fixing line above the window; a face mount fixes to the wall above the opening. For a double track, mark both track positions before measuring. This helps you check that the curtain layers can move freely and that the fixing surface can accommodate the brackets.
- Measure the ceiling recess at several points, recording its internal width, depth and height. Recesses can vary along their length, so use the tightest usable dimensions when planning the track position. Note any cornice, pelmet or change in ceiling level that affects the route. For a track below a cornice, leave a minimum gap of 10 mm between the cornice underside and track top.
- For a wall-fixed track, mark the bracket line and check how far each track will project from the wall. The double-track arrangement described projects 220 mm to 250 mm out from the wall, so measure the available room around that projection. If using the Quickfit Smart Drape S-Fold Curtain Track, allow at least 6 cm of clearance in front of and behind the track for the fabric.
- Check the mounting surface along the full fixing route before choosing a ceiling or wall mount. Curtain tracks are best attached to wall studs and can also be attached to concrete, stone, brick or tile. Record where the fixing points fall in relation to the track and brackets. A wall mount may suit a clear, accessible wall face; a ceiling mount may work better when the ceiling provides the intended route.
- Plan double-track positions around the curtain layers, not just the window opening. Measure from the fixing surface to each track line, then consider how the front and rear fabrics will hang and move. Leave space for fabric between and around the tracks, and include the motor position at one end. This puts the track route, brackets and curtain movement into one plan.
- For a wall-fixed track, measure the curtain drop from the underside of the track, not from the top of its bracket. For a ceiling mount, measure from the planned track position. Use the same reference point for both curtain layers, so their finished drops match the actual track position.
Allowing for curtain stack-back
- Mark where each curtain will sit when fully open, not just where it hangs across the window. A centre-opening pair gathers at both track ends; a one-way draw gathers at the chosen end. Allow for this stack-back when setting the full track length. Otherwise, open curtains may cover part of the glass or crowd an adjacent wall.
- Use the window-frame width and opening direction to plan the fabric stack. For a centre-opening curtain that stacks beyond the window, share the added track width between both sides. For a one-way curtain, add the width at the stacking end. Mark these positions on the wall or ceiling before installation, so the brackets support the planned route.
- Check how far the curtain fabric projects from the mounting surface. The double curtains described project 220 mm to 250 mm out from the wall. For the Quickfit Smart Drape S-Fold Curtain Track, allow at least 6 cm of clearance in front of and behind the track for fabric. These clearances help account for the curtain’s path, rather than only the track’s narrow profile.
- Reserve space at one end for the motor before fixing the track position. Allow room for installation and future servicing, and keep that end clear of nearby walls, pelmets and other obstructions. A motor at the stacking end can affect the usable run, so mark its position alongside the curtain stack and bracket locations. Do not plan for fabric to gather where the motor needs access.
- Walk through the full opening and closing path before finalising the layout. Check both layers on a double track, including where their leading edges meet or finish. Confirm that the stack sits outside the glass where intended and that fabric has room in front of and behind the track. Keep the motor position and bracket points visible on the same plan.
- Record the finished arrangement with the track length, opening direction, stack location and motor end clearly labelled. Use millimetres and distinguish the total track span from the window-frame width. This helps prevent ordering a track sized only for the curtains when closed, rather than one that also accommodates the fabric when fully open.
Checking clearance from handles, blinds and radiators
Before fixing brackets, measure the track position, curtain projection and nearby obstructions. Check window handles, blind controls, radiator edges and the motor location against the full curtain path.
- Mark the proposed track height and project its position out from the wall. Measure how far the window handle, latch or winder extends into the room. Check with the window both closed and open, as an open sash may take up more space. The curtain should pass the handle without catching or pressing against it.
- Include the curtain fabric, not just the track, in your clearance check. Hold a straightedge at the planned track position to represent the fabric’s path, then compare it with handles, window frames and nearby walls. For a deep handle, check its closest point along the full shape. Clearance beside the handle may still be too tight near the frame.
- Raise and lower existing blinds through their full operating range. Note the blind headrail, bottom rail, pull cords and control chain. Check whether these parts sit behind or beside the proposed curtain track. A blind may operate freely on its own but still conflict with curtain fabric when both treatments share the window space.
- Measure the radiator’s position in relation to the planned curtain drop. Note its top edge, front projection and distance from the wall, then consider where the fabric will hang when closed. Check whether the curtain could rest against the radiator or block access to its controls. Record the actual obstruction rather than assuming the window’s centreline leaves enough room.
- Check the motor end separately from the curtain’s travel path. Look for a return wall, pelmet, blind hardware or other fitting that could obstruct the motor housing or access. Mark the motor position and each bracket on the same layout. This can reveal conflicts that a clear track route across the window would otherwise hide.
- Walk through the planned operation before finalising the fixing height. Open the window, operate the blinds and picture the curtains fully open and closed. Record the tightest point, its location and the object causing it. Use those notes to adjust the track position or choose a route that clears the obstruction without blocking normal access.
Once the clearance route is settled, measure the curtain drop from the planned top of the track to the floor, without adjustments. For curtains intended to just touch the floor, check how the chosen finish affects the required drop measurement. When the hem needs to remain clear of the floor across the opening, use the shortest practical drop measurement.
The Quickfit Smart Drape S-Fold Curtain Track is made from powder-coated aluminium and plastic. A double wall bracket is recommended for this track if it needs to project more than 5 cm from the wall, so include that projection when checking nearby obstructions.
Extending the track beyond the window frame
- Start with the outside edges of the window frame, not the visible glass. Electric curtain tracks should normally extend beyond the window on both sides, allowing open curtains to clear more of the glass. Mark the left and right frame edges at the planned track height. Use these as references for each extension, rather than treating the opening width as the finished track length.
- Choose an extension based on how much of the glass you want exposed when the curtains are open. Allow roughly 150 to 300 mm beyond the frame on each side for a motorised track extending past the window. For a track intended to frame the window, extend it 100-200 mm past each side. These are different planning allowances, so use the one that suits the intended result.
- Mark each extension separately. Measure from the left frame edge to the proposed track end, then repeat from the right. If a corner leaves less clear wall on one side, record the available space instead of assuming both sides can take the same extension. The motor position and opening direction also affect where the fabric gathers.
- Check the wall beyond both frame edges before settling on the track route. Note corners, adjacent openings and other fixed features that could limit the track. Use a tape measure and pencil marks to check whether the proposed extension fits the actual wall, rather than an assumed symmetrical space. If the available wall differs at either end, record both measurements clearly.
- Allow for the intended open position. A centre-opening pair gathers at both ends, while a one-way draw gathers at one end. Compare the stack location with the planned extension so the fabric can sit beyond the glass where possible. Include the motor end in the same plan to avoid reducing usable track space without noticing.
- Record the frame width, left extension, right extension and full intended track span as separate measurements in millimetres. Measure the planned route twice and label each figure. That record makes it easier to distinguish a framing allowance from an allowance designed to clear more glass. For help matching your measurements to a smart curtain track, explore the available options.
Asthome Smart Electrical Supplies: Smart Curtain Motor and Track
Asthome Smart Electrical Supplies offers a Smart Curtain Motor and Track for readers choosing a motorised curtain solution. Your track span, mounting position, stack-back allowance and motor location give you a practical basis for selecting a setup that suits the window layout.
Products are approved for sale and use in Australia with SAA, carry the RCM Logo and have a registration number to reference. Asthome offers a broad range of brands and smart-home components, with best prices across the market. If you need product assistance, the team provides prompt responses to help with your questions.
Contact Asthome Smart Electrical Supplies with your measurements and room plan to discuss your product options.
Plan your next smart-home step
Careful measuring for a smart curtain track gives you a sound basis for choosing a setup that suits the room. Consider how the curtains will be used each day, then decide whether other smart-home controls belong in the same project.
Asthome Smart Electrical Supplies offers products approved for sale and use in Australia with SAA. They carry the RCM Logo and have a registration number to reference. The range also includes the Matter Smart Switch Module, Zigbee 3.0 Smart Switch Module and Smart Zigbee Dimmer Module.
For product assistance or to discuss your requirements, contact Asthome Smart Electrical Supplies. Take the next step with your measurements and room plan ready.
Frequently Asked Questions
How do I determine the correct size?
Measure the full intended track route, then account for the opening style and curtain movement. A track covering a window needs room for the fabric to stack clear of the glass; a wall-to-wall installation follows the available wall width. Record the track width separately from the window-frame width, using millimetres. The mounting position and the track manufacturer’s ordering method determine which measurement to enter.
How do I measure a window for a smart curtain track?
Measure across the opening at the planned fixing height with a steel tape, then repeat the reading. Record the frame width and intended track span separately. Measuring for a smart curtain track also means deciding where the curtains should sit when open. Include the planned extensions and stack locations, rather than using the glass width as the finished track length.
How much extra track length should I allow beyond the window frame?
Allow roughly 150 to 300 mm beyond each side for a motorised track extending past the frame. If the aim is to frame the window, an extension of 100-200 mm on each side is another stated allowance. These figures describe different goals, so choose based on how far the open fabric should clear the glass. Measure each side separately if wall space differs.
How do I measure for a smart curtain track mounted inside a window recess?
Measure the recess’s internal width, depth and height at several points, then note the narrowest usable space at the proposed track position. Apply the width reduction specified for that manufacturer and model. There is no single deduction that applies to every brand. Label the raw recess measurement and adjusted ordering measurement separately to avoid applying the reduction twice.
How much clearance is needed for curtains to stack back beside the window?
For a wall-mounted track, allow 8-12 inches beyond each side of the window width for stack-back. For a centre-opening curtain stacking off the frame, add 40% to the frame width, split as 20% on each side. A one-way curtain stacking off the window also needs 40% added, all at its stacking end. The fabric and opening direction affect where that space is needed.
How do I measure for a curved or bay-window smart curtain track?
For a bay window, measure each wall section along the proposed track route instead of recording one straight span. For angled bays, measure the angles where possible and list each track section from left to right. For an L-shaped or corner layout, record each run separately and note whether the curtains should travel around the corner or operate independently. This makes the route’s shape clear.