

Blasting your media room with standard ceiling downlights is the fastest way to ruin a pristine picture. When creating a home theatre lighting scene, true cinematic immersion is never about plunging the room into pitch darkness; it requires balanced, layered illumination with zero screen reflections.
There is nothing more frustrating than distracting screen wash, buzzing drivers, or LEDs that flicker the second you dim them down for movie night. Sorting through Matter, Zigbee, and Wi-Fi protocols can be just as daunting, particularly when you need confidence that your in-wall gear meets mandatory SAA certification to keep your home insurance completely valid.
In this guide, you will master the art of designing, automating, and installing a cinema-grade lighting setup that dims your lights and closes your curtains with a single tap. We'll step through selecting reliable smart switch and dimmer modules that retrofit neatly behind standard Australian wall plates, giving you smooth, flicker-free control safely wired by your licensed electrical contractor.
Key Takeaways
- Layer ambient, task, and accent lighting strategically to eliminate harsh screen reflections while preventing eye fatigue during extended viewing sessions.
- Learn the essential steps for creating a home theatre lighting scene using a Smart Zigbee Dimmer Module to ensure smooth, flicker-free dimming down to true theatrical levels.
- Pair lighting automation with a Smart Curtain Motor and Track to lock out daylight and create an instant blackout environment with a single tap.
- Fit compact smart switch and dimmer modules neatly behind existing Australian wall plates to maintain your room aesthetic without costly rewiring.
- Protect your home insurance policy and domestic electrical safety by insisting on SAA-certified hardware installed by a licensed Australian electrical contractor.
The Core Principles of Designing a Cinematic Lighting Scene
Creating a home theatre lighting scene requires far more thought than simply turning off the main downlights. If you leave a room completely black, your iris dilates fully, making high-contrast HDR highlights on an OLED or projector screen physically exhausting to watch. Conversely, unmanaged ambient spill washes out black levels and introduces severe optical glare across your display. Striking the right balance involves deploying network-based lighting control to isolate light paths, preserving picture contrast while delivering visual comfort.
Layering Ambient, Accent, and Bias Illumination
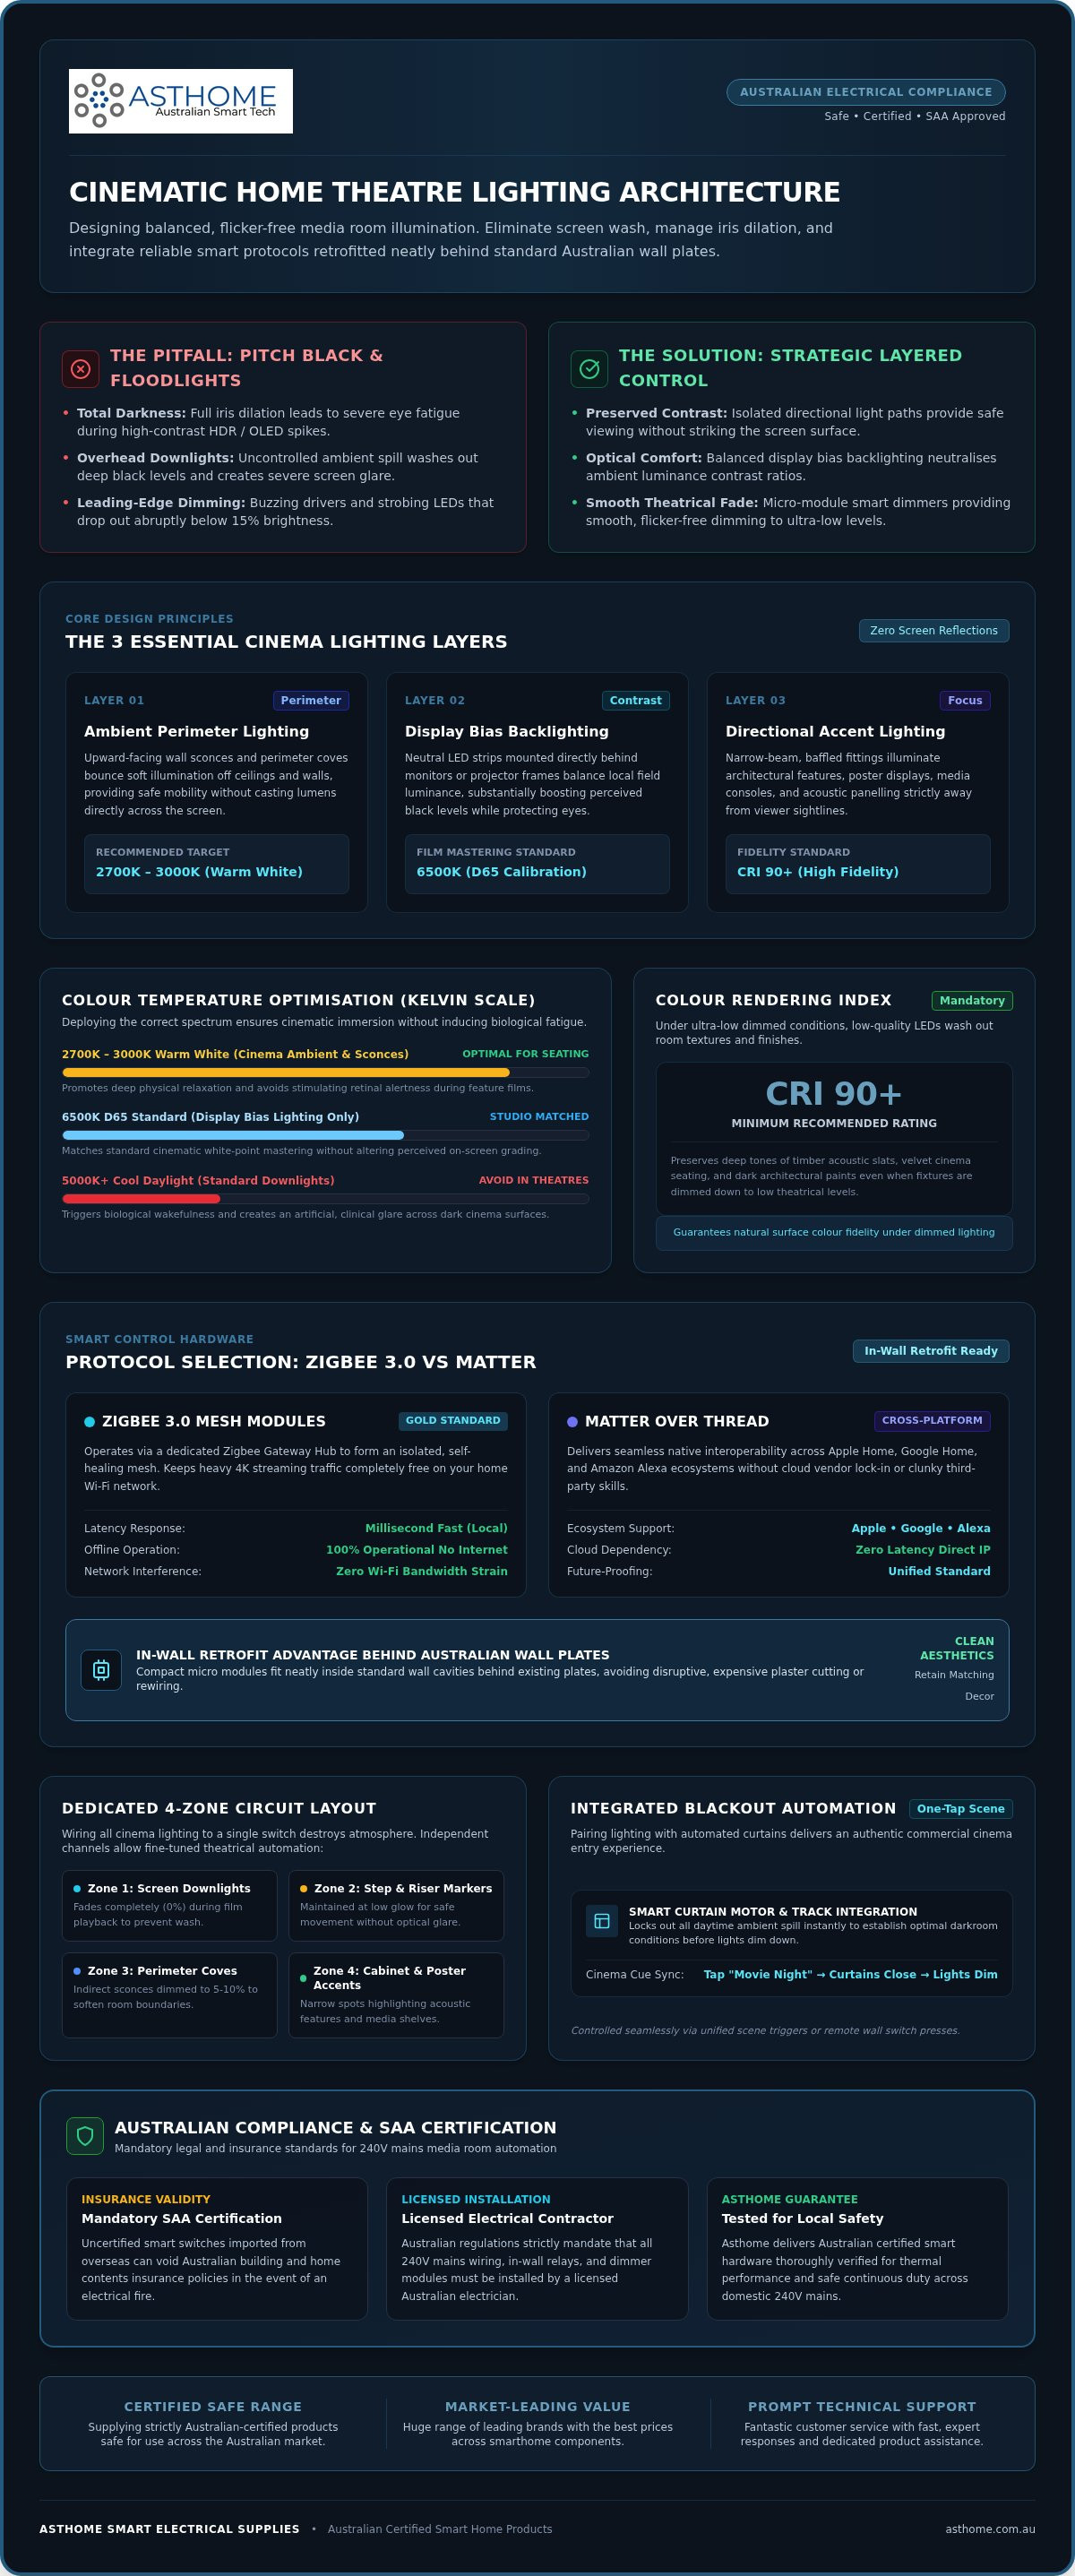
Ditch overhead floodlights. Successful cinema layouts rely on three discrete lighting layers working in unison:
- Ambient perimeter lighting: Upward-facing wall sconces bounce light off ceilings and walls, spreading soft illumination without throwing light directly across the screen face.
- Display bias lighting: Placing neutral LED strips directly behind your television or projector screen balances local field luminance, expanding perceived contrast and reducing eye fatigue.
- Directional accent lighting: Narrow-beam, baffled fittings highlight poster frames, media consoles, or custom acoustic panelling without spilling unwanted lumens into the viewer's direct sightline.
Selecting Proper Colour Temperatures and High CRI
Stick strictly to warm white colour profiles between 2700K and 3000K for your ambient fixtures. Cool daylight temperatures (5000K+) trigger alertness and pull your eyes away from the screen, ruining immersion. In contrast, bias backlighting behind monitors should sit close to 6500K (D65) to match standard film mastering white points.
Ensure every luminaire features a Colour Rendering Index (CRI) of 90 or higher. High-CRI lighting prevents fabrics, timber cabinetry, and dark paint finishes from appearing dull or sickly under dimmed conditions, maintaining rich interior tones even at very low light outputs. If you are searching for stylish fixtures to complement your media space, discover Ergovanta for an extensive range of wall, ceiling, and ambient lighting options.
Zoning Strategy for Dedicated Home Cinemas
Avoid wiring all cinema lights onto a single switch. Effective control demands independent channels for downlights, step markers, perimeter coves, and cabinetry accents. This division lets you isolate primary seating zones during a film while leaving low-level riser lighting active for safety. When creating a home theatre lighting scene, coordinate with your electrician early. Australian regulations mandate that 240V mains wiring requires a licensed Australian electrical contractor, so plan your circuit runs and in-wall module placement before fixing acoustic treatments to the studs.
Choosing the Right Smart Control Hardware and Dimming Protocols
A cinematic automation setup falls apart if your control hardware introduces input lag or causes your downlights to strobe. Modern architectures have moved past clunky, expensive proprietary automation racks. When creating a home theatre lighting scene today, open wireless protocols deliver instantaneous, reliable responses without locking you into a single hardware vendor. Professional guidelines for designing lighting control systems emphasise pairing local network controllers with stable dimming interfaces to guarantee predictable scene execution.
Zigbee 3.0 vs Matter Smart Modules for Media Rooms
Zigbee 3.0 remains the gold standard for dedicated theatre rooms because it forms an isolated, self-healing mesh network via a Zigbee Gateway Hub. This keeps high-bandwidth video streaming on your primary Wi-Fi completely free of automation traffic. Installing an in-wall zigbee 3.0 smart switch module gives you local, millisecond-fast relay response times even if your internet connection drops out mid-movie.
If you run a cross-platform household combining Apple Home, Google Home, and Amazon Alexa, deploying a certified matter smart switch provides seamless native interoperability over Thread. Both protocols eliminate cloud latency, triggering coordinated lighting cues the moment you hit play.
Eliminating LED Flicker with Quality Dimmable Drivers
Standard leading-edge phase dimmers often cause cheap downlights to hum loudly or drop out entirely below 15% brightness. That humming can ruin quiet dialogue scenes. Pairing a high-grade smart zigbee dimmer module with a dedicated trailing-edge Dimmable LED Driver delivers silky, continuous fading right down to 1% without strobing.
Always verify minimum load requirements. High-grade digital drivers prevent the ghosting and residual glow that plague lower-spec fittings when switched off.
In-Wall Smart Modules vs Complete Smart Switches
Choosing between micro modules and replacement wall switches comes down to room styling:
- In-wall micro modules: Compact units sit directly inside your wall cavity behind standard Australian switch plates, allowing you to match your theatre's existing architectural faceplates.
- Integrated smart switches: Complete glass-fronted Smart Wi-Fi Light Switch units replace standard plates entirely, adding tactile touch controls and backlit status rings.
Check that your electrical switch boxes feature an active neutral wire before ordering parts. If you are comparing hardware options across leading brands, Asthome provides competitive trade prices, prompt technical assistance, and fully SAA-certified smart modules ready for your electrician to install safely.
Step-by-Step: Creating and Automating a Home Theatre Lighting Scene
Executing an authentic cinematic scene takes more than snapping downlights off with a wall plate toggle. Commercial cinemas rely on gradual dimming rates and targeted perimeter cues to set expectations before the opening title rolls. When creating a home theatre lighting scene on your smart hub, taking a systematic approach to channel grouping, target levels, and transition rates makes all the difference between a jarring flick of a switch and a premium movie experience.
Follow these four practical steps to set up your primary theatre scene:
- Step 1: Group your zones: Open your automation app (such as Home Assistant, Apple Home, or Google Home) and group your in-wall modules into dedicated functional areas: Screen Bias, Step Paths, Ceiling Downlights, and Cabinet Accents.
- Step 2: Assign target brightness: Map out specific percentage values for each lighting type rather than applying a blanket dim level across the entire room.
- Step 3: Programme fade transitions: Configure soft transition curves so your luminaires glide gently between states rather than cutting out instantly.
- Step 4: Establish input triggers: Link the finished lighting profile to physical wireless scene buttons, voice automation routines, or media player playback states.
Configuring Brightness Ratios and Smooth Fade Rates
Dial in your light levels carefully for actual movie viewing. Drop your overhead downlights completely to 0% to prevent hot spots. Set your television or projector bias lighting strip to a subtle 10% to 15% brightness, giving your eyes a balanced reference plane without degrading deep screen blacks.
Keep low-level perimeter step markers and floor cove channels resting at 5%. Crucially, programme a 4 to 6 second fade-down rate. That soft transition mirrors commercial cinemas, giving viewers' pupils time to adapt naturally to the darker environment without sudden disorientation.
Creating Intermission and Credits Scenes
Pause buttons shouldn't leave guests fumbling in the dark. Create an automated 'Intermission' preset that raises pathway lights to 25% and bias lighting to 30%, keeping overhead fixtures completely dark. When the credits roll, trigger an 'Exit' scene that gently lifts perimeter sconces to 50% over eight seconds, providing comfortable illumination to navigate out of the room safely.
Assigning Triggers: Wireless Switches, Voice, and App Control
Convenience dictates how often you will actually enjoy your setup. Relying solely on a smartphone app while sitting on the lounge gets tedious fast. Mount a compact, battery-powered Zigbee wireless scene button onto your coffee table or recliner armrest. A single press can trigger the primary movie scene, a double press can fire up intermission, and a long hold can shut everything down.
You can also map simple voice commands like "Hey Google, cinema time" to coordinate your lighting presets simultaneously. For total automation, configure playback triggers directly through your media streaming box so pressing pause on the remote automatically brings up low walkway illumination.
Integrating Motorised Curtains, Sensors, and AV Equipment
Creating a home theatre lighting scene should not happen in isolation. True cinematic immersion requires orchestrating your ambient lighting, natural window shading, and media hardware into one synchronised sequence. For enthusiasts outfitting dedicated media systems with pro-grade splitters, extenders, or video switchers, specialist audio-visual retailers such as HDTV Supply provide the connectivity backbone needed to link complex setups reliably. When you fire up a movie, your room ought to transform autonomously: window drapes pull shut, audio-visual gear powers up, and architectural illumination glides down to viewing levels.
Automating Blackout Curtains with Smart Curtain Tracks
Even small amounts of daylight leakage or passing street glare can wash out projector screens and high-end OLED displays. Pairing your lighting presets with an automated Smart Curtain Motor and Track ensures heavy blackout drapes close completely the second your cinema routine triggers. Setting the motor speed to whisper-quiet mode eliminates distracting mechanical hum while the opening titles commence.
Pathway Safety Automation Using Smart Motion Sensors
Nobody wants to break immersion by reaching for a phone or wall switch during a film. Placing a discreet motion sensor underneath your recliner or along the base of the riser solves this issue effortlessly.
When someone stands up for refreshments, the sensor detects foot movement and lifts low-level step treads to a dim 10% output. Floor-level illumination directs the occupant safely to the door while remaining below the direct eye-line of seated viewers. Automation rules can easily filter out small pets while keeping transitions instantaneous.
Power-State Triggers via Smart Power Points
Rather than relying on manual apps or remote toggles, let your AV hardware dictate room illumination. Plugging your primary subwoofer or home theatre amplifier into an SAA-certified Smart Power Point (GPO) allows you to use live electrical wattage as an automation trigger. When your receiver boots up and draws active operational load, your smart hub instantly dims room lighting and shuts the curtains.
When the system enters standby mode, the smart socket detects the idle drop, raising walkway sconces so your family can safely exit. Because socket replacement deals with live 240V mains, review Australian GPO standards and have your licensed electrical contractor carry out the changeover.
Ready to synchronise your cinema room? Explore the comprehensive selection of certified curtain tracks, sensors, and power points at asthome.com.au to source quality components backed by trade pricing and expert technical support.
Australian Electrical Compliance and SAA Certification Requirements
Creating a home theatre lighting scene should never mean cutting corners on electrical safety. Australia runs on a 230/240V 50Hz mains supply, which places serious thermal and dielectric stress on compact in-wall modules. Grabbing unbranded, bargain smart modules from overseas auction sites poses a severe fire risk and exposes your property to devastating financial liability.
Why SAA Certification and RCM Marks Matter
Electrical gear installed in domestic walls must carry formal SAA certification and display the Regulatory Compliance Mark (RCM). These marks prove the hardware satisfies rigorous Australian and New Zealand safety standards (such as AS/NZS 60598 and AS/NZS 61347). Certified modules are built to handle local grid variations, line noise, and enclosed cavity temperatures.
Installing uncertified imported smart switches directly voids standard Australian building and contents insurance policies. If an unapproved relay causes an electrical fire behind your plasterboard, insurers can reject your claim on the spot. Ensuring your in-wall hardware carries verified certification protects your home, your family, and your financial investment.
Working with a Licensed Australian Electrical Contractor
In Australia, all 240V mains wiring is strictly regulated under the AS/NZS 3000 Wiring Rules. DIY mains electrical work is illegal across every state and territory. You must engage a licensed electrical contractor to handle mains connections, fit in-wall micro modules behind wall plates, and install ceiling drivers.
Hand your sparkie fully certified smart gear engineered specifically for standard Australian electrical wall boxes. Once the installation is finished, always request an Electrical Safety Certificate or Certificate of Compliance. This formal document proves the work was done to code, keeping your building warranty intact.
Sourcing Certified Hardware from Asthome
Finding genuine, compliant smart home gear across different brands shouldn't be an uphill battle. When creating a home theatre lighting scene, trade professionals and homeowners turn to Asthome for complete peace of mind. Asthome delivers an extensive range of SAA-certified smart switches, Zigbee dimmers, and in-wall modules that drop cleanly behind existing Australian wall plates.
Every product is tested and approved for the Australian market, backed by competitive prices and prompt technical assistance from specialists who understand local trade requirements. Get your gear right the first time and enjoy reliable, flicker-free cinema automation backed by verified Australian compliance.
Upgrade Your Home Cinema with Certified Smart Control
Mastering your media space comes down to striking the ideal balance between crisp, high-impact visuals and controlled, atmospheric illumination. By layering subtle screen bias lighting, low-level perimeter pathways, and automated blackout tracks, you eliminate washed-out black levels and distracting glare. Taking the time to configure gradual transition curves ensures that creating a home theatre lighting scene elevates everyday movie nights into an authentic cinema experience.
Safety and reliability remain just as critical as aesthetics. Always protect your home insurance and household wiring by choosing hardware engineered specifically for local 240V conditions. Whether you're a homeowner planning a retrofit or a contractor looking for wholesale trade accounts, Asthome delivers an extensive brand selection with market-leading prices across smart electrical components. Every switch and dimmer carries 100% SAA certification, backed by prompt Australian customer support and trade-level technical guidance.
Explore SAA-certified smart lighting modules at Asthome today and give your media room the seamless, cinematic automation it deserves.
Frequently Asked Questions
Can I create a home theatre lighting scene without a neutral wire?
Yes, you can use no-neutral switch hardware, but having a dedicated neutral wire is strongly recommended when creating a home theatre lighting scene. Dimmers without a neutral feed trickle a tiny current through the circuit to stay powered. That often causes low-wattage theatre LEDs to glow faintly or pulse when switched off. If your wall box lacks a neutral wire, ask your electrician to run one for flawless low-end dimming stability.
What is the best colour temperature for home cinema lighting?
Warm white between 2700K and 3000K is ideal for ambient architectural fixtures and wall sconces. Warm tones keep the room relaxing and prevent harsh blue spectrum light from reflecting off surfaces or distracting your peripheral vision. For bias backlighting directly behind your display, videophiles often prefer a calibrated 6500K daylight white to preserve mastering colour accuracy. Always choose fittings with a CRI rating above 90.
How do I prevent my LED downlights from flickering when dimmed low?
Eliminate flickering by pairing a trailing-edge smart dimmer module with a high-grade Dimmable LED Driver. Most low-end flicker occurs when mismatched dimmer electronics struggle below a 10% load threshold. High-performance trailing-edge modules provide smooth, gradual phase control down to true theatrical levels. Setting a minimum brightness floor within your smart automation app also stops the circuit from dropping below the lamp's physical stability limit.
Why is bias lighting recommended behind television screens and projectors?
Bias lighting casts a soft, indirect glow onto the surface directly behind your display to balance ambient field luminance. In a dark room, your pupils constantly dilate and contract between murky shadows and bright highlights, causing rapid eye strain. A subtle halo of rear illumination softens that dynamic contrast jump. It also tricks your visual perception into seeing deeper screen blacks and richer picture contrast.
Can I legally install 240V smart dimmer modules myself in Australia?
No, DIY installation of 240V mains electrical hardware is illegal across every Australian state and territory. Under AS/NZS 3000 Wiring Rules, any fixed electrical modifications behind wall plates must be completed by a licensed Australian electrical contractor. Performing unlicensed electrical work exposes your home to fire risks, attracts severe regulatory penalties, and instantly invalidates your property insurance. Always provide your electrician with verified, SAA-certified smart modules.
What is the difference between Matter and Zigbee modules for media rooms?
The primary distinction involves networking architecture and platform integration. Zigbee 3.0 operates on an isolated, local wireless mesh coordinated by a dedicated Zigbee Gateway Hub, keeping automation traffic completely separate from your home Wi-Fi network. Matter over Thread provides universal cross-platform interoperability across Apple Home, Google Home, and Alexa without proprietary bridges. Both deliver instantaneous, cloud-free local execution for home cinema automation.
How do I trigger my cinema lighting scene automatically when a movie starts?
You can automate scene execution using playback states, smart plugs, or dedicated buttons. When creating a home theatre lighting scene, linking your streaming box or receiver to Home Assistant allows "Play" commands to dim lights automatically. Alternatively, plugging your AV receiver into an SAA-certified Smart Power Point lets your smart hub detect live power draw, firing your movie scene the instant the amplifier powers up.